Programming a Xilinx XC9500XL CPLD with a Raspberry Pi and xc3sprog
I recently got a breakout board for the XC9572XL CPLD from Dangerous Prototypes to play around with, which was particularly interesting to me because of its 5v tolerant I/O banks. Soon after it arrived, though, I realized I didn’t have an ISE-compatible Xilinx JTAG adapter to program it, but thankfully a number of open source solutions exist that allow you to program the device without forking over $270 to Xilinx for what is essentially a Cypress FX2 microcontroller in a red box.
In this post, I’ll demonstrate how to use the matrix-io fork of xc3sprog to program the CPLD from a Raspberry Pi. It’s also worth noting that others have gotten this working with OpenOCD, but I’ve had the best luck with xc3sprog. It also lets you program the .jed file produced by ISE directly without any intermediate conversion steps, which is a nice bonus.
Prerequisites
You’ll just need a Raspberry Pi (any version will do, but versions < 4 will work best) and a CPLD with the JTAG connection broken out. I’m using standard 2.54mm breadboard jumper wires to connect the Pi to the breakout board. For the OS, I’m using the standard Raspberry Pi OS (formerly Raspbian) minimal image, but presumably any Linux distro will do.
You’ll also (obviously) need a .jed file produced by ISE that you want to program to the device. Getting ISE up and running is out of the scope of this tutorial, but suffice to say it’s not a pleasant experience on modern Linux distros.
Building xc3sprog
The first step is to build xc3sprog on the Pi. There are a few dependencies which can all be obtained from Raspberry Pi OS’s repository:
$ sudo apt-get update
$ sudo apt-get install build-essential libusb-dev libftdi-dev libgpio-dev wiringpi git cmake
Next, we’ll clone xc3sprog and build it with cmake. We’re using a fork that adds support for the Pi’s native GPIO interface, in addition to a generic linux sysfs GPIO interface (more on this later).
$ git clone https://github.com/matrix-io/xc3sprog && cd xc3sprog
$ mkdir build && cd build
$ cmake ..
$ make
If all goes well, you’ll have a shiny new xc3sprog binary in your current working directory.
Wiring the Pi to the CPLD
The next step is to physically connect the Pi’s GPIO pins to the CPLD. Surprisingly enough, I couldn’t find the actual
JTAG pinout that xc3sprog uses documented anywhere (which is part of the reason I decided to write this post and document it).
After some digging through the code, I found that the constructor for the IOWiringPi class accepts the GPIO pin numbers
used for JTAG and it’s called here
for the WiringPi backend and here for the sysfs backend.
The choice of which backend you want to use will depend on which Raspberry Pi model you have. The WiringPi backend is much faster but doesn’t support the Pi 4 whereas the sysfs backend works on all models but is much slower. If you have a Pi <= 3, I’d recommend using the WiringPi backend. Thankfully the pinout is the same regardless of which backend you choose.
Using the numbers from the constructor calls above, we can deduce the following pinout:
| Signal | GPIO |
|---|---|
| TMS | 4 |
| TCK | 17 |
| TDI | 22 |
| TDO | 27 |
Note that these are GPIO pin numbers and don’t correspond to the pin numbers of the Raspberry Pi’s expansion header.
We can see how these GPIO pin numbers correspond to pins on the expansion header in this image:
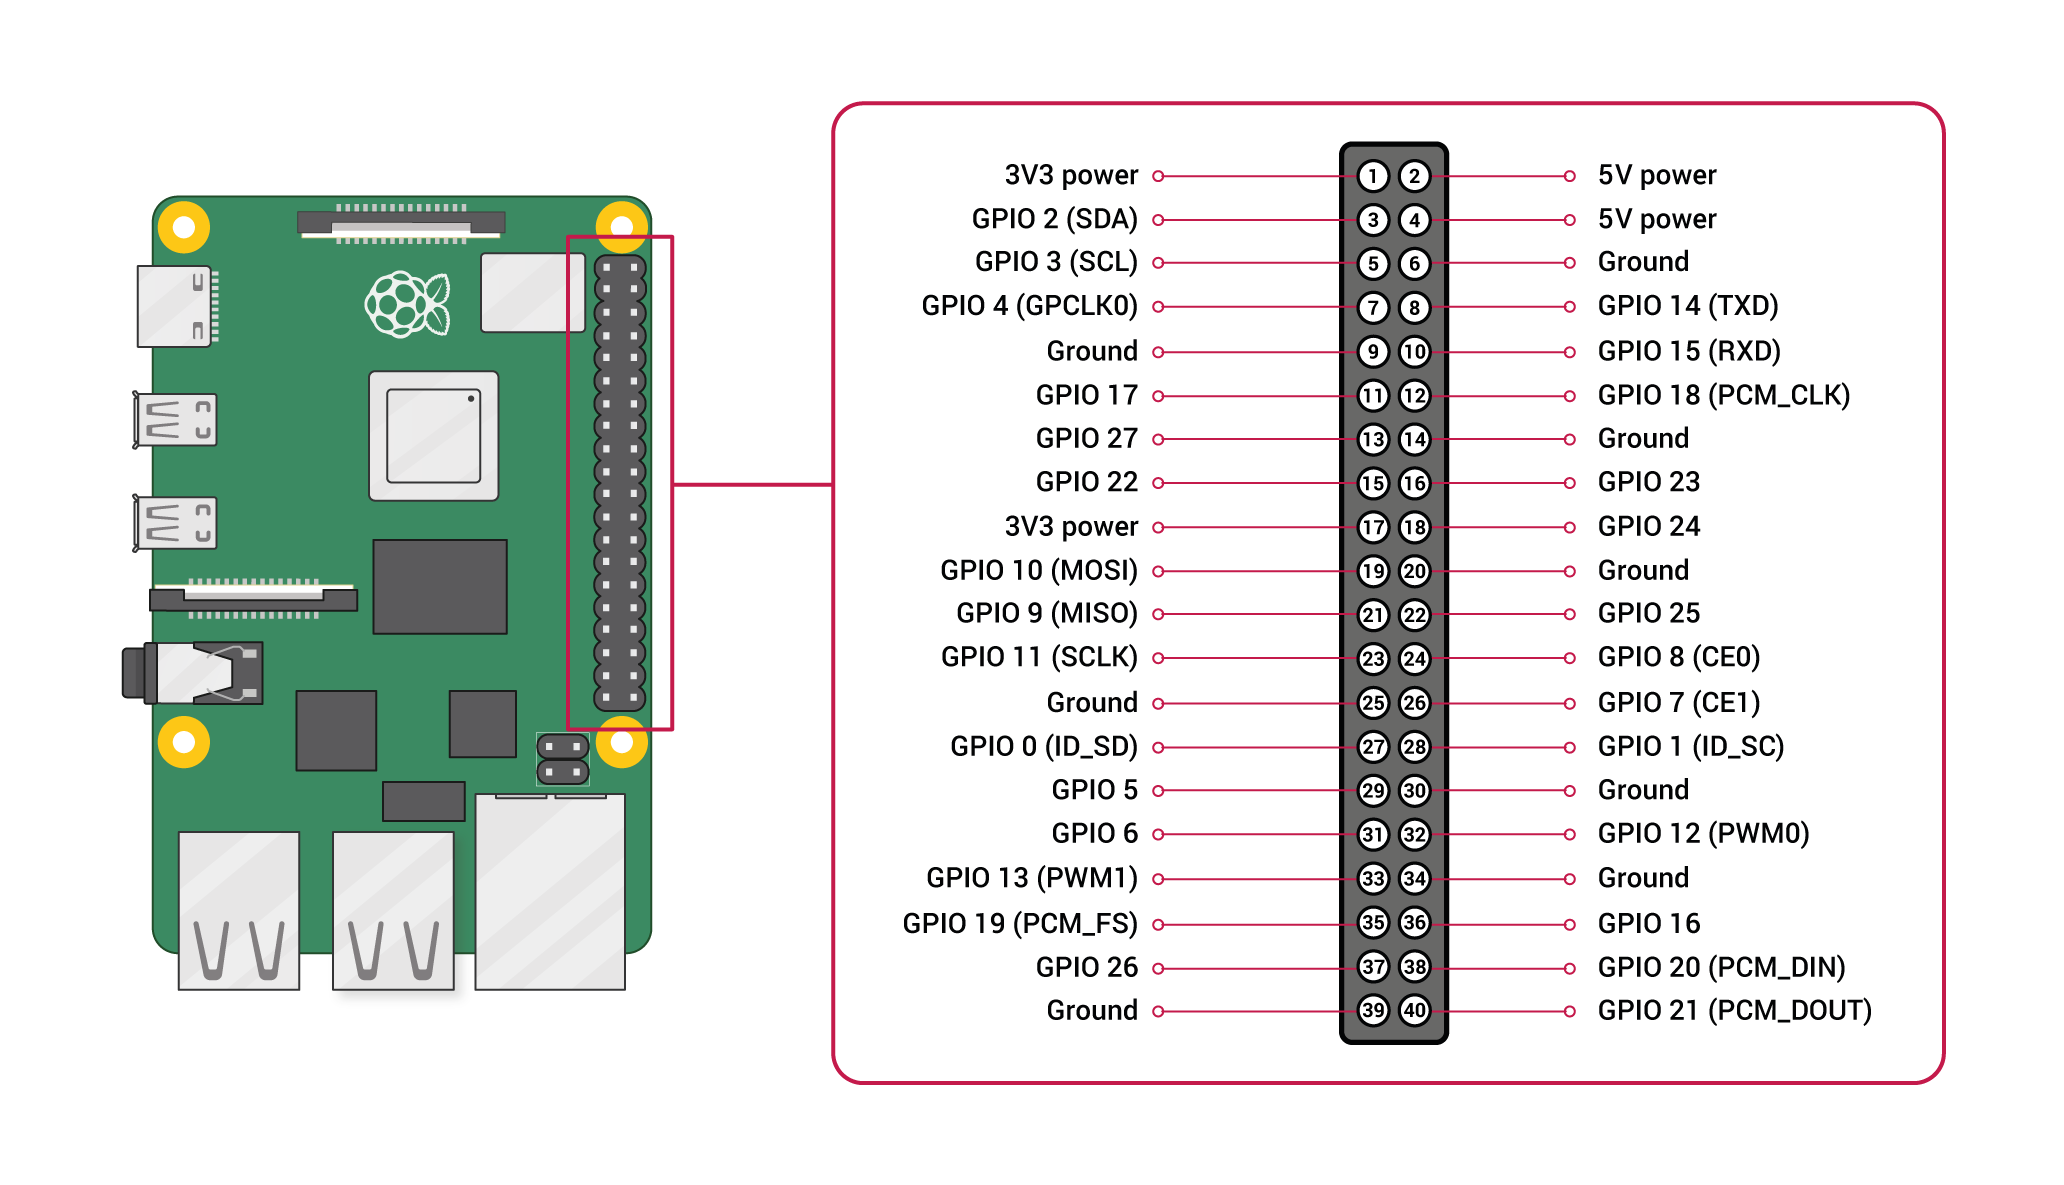
This means that JTAG signals should be connected to the following expansion header pins
| Signal | GPIO | Header Pin |
|---|---|---|
| TMS | 4 | 7 |
| TCK | 17 | 11 |
| TDI | 22 | 15 |
| TDO | 27 | 13 |
After wiring these up in addition to a ground pin (and an appropriate voltage pin if you’re powering the CPLD from the Pi), we can finally use xc3sprog to program the device.
Programming the CPLD
With the Pi set up, the next thing to do is see if xc3sprog can detect the CPLD on the JTAG bus:
$ ./xc3sprog -c <backend> -j
Replace <backend> with matrix_creator for the WiringPi backend or sysfsgpio_creator for the sysfs one.
If all goes well, you should see something like this:
JTAG loc.: 0 IDCODE: 0x59604093 Desc: XC9572XL Rev: E IR length: 8
We can see that my CPLD was detected at JTAG location 0. If you don’t see anything, double check your wiring.
To program a .jed file now, all we need to do is pass it to xc3sprog:
./xc3sprog -c <backend> -p <JTAG location from above> -v <path/to/file.jed>

Happy hacking!